Compatible with the following Brands & Models (hover over each)
Aggresor Yes - Please Call us If Any Questions
AirVac Yes - Please Call us If Any Questions
Astrovac Yes - Please Call us If Any Questions
Beam Yes - Please Call us If Any Questions
Black & Decker Yes - Please Call us If Any Questions
Broan Yes - Please Call us If Any Questions
Brute Yes - Please Call us If Any Questions
Budd Requires 1-1/4 inch opening - Call First
Cana-Vac Yes - Please Call us If Any Questions
Centralux Yes - Please Call us If Any Questions
Cirrus Yes - Please Call us If Any Questions
CV International Yes - Please Call us If Any Questions
Dirt Devil Yes - Please Call us If Any Questions
DrainVac Yes - Please Call us If Any Questions
DuoVac Yes - Please Call us If Any Questions
DustCare Yes - Please Call us If Any Questions
Easy-Flo Yes - Please Call us If Any Questions
Electrolux Yes - Please Call us If Any Questions
Eureka Yes - Please Call us If Any Questions
Fasco Yes - Please Call us If Any Questions
Filtex Yes - Please Call us If Any Questions
Fridgidaire Yes - Please Call us If Any Questions
Hayden Yes - Please Call us If Any Questions
HoneyWell Yes - Please Call us If Any Questions
Hoover Yes - Please Call us If Any Questions
Imperium Yes - Please Call us If Any Questions
Kenmore Requires 1-1/4 inch opening - Call First
MD Yes - Please Call us If Any Questions
Nadair Yes - Please Call us If Any Questions
NuTone Yes - Please Call us If Any Questions
Patton Yes - Please Call us If Any Questions
PowerStar Yes - Please Call us If Any Questions
Pullman-Holt Yes - Please Call us If Any Questions
PurVac Yes - Please Call us If Any Questions
Riccar Yes - Please Call us If Any Questions
Royal Yes - Please Call us If Any Questions
Sequoia Yes - Please Call us If Any Questions
Signature Yes - Please Call us If Any Questions
Simplicity Yes - Please Call us If Any Questions
Smart Yes - Please Call us If Any Questions
VacuFlow Requires 1-1/4 inch opening - Call First
VacuMaid Yes - Please Call us If Any Questions
Valet Yes - Please Call us If Any Questions
Vent-A-Vac Yes - Please Call us If Any Questions
Walvac Yes - Please Call us If Any Questions
Whirlpool Yes - Please Call us If Any Questions
Zenex Yes - Please Call us If Any Questions
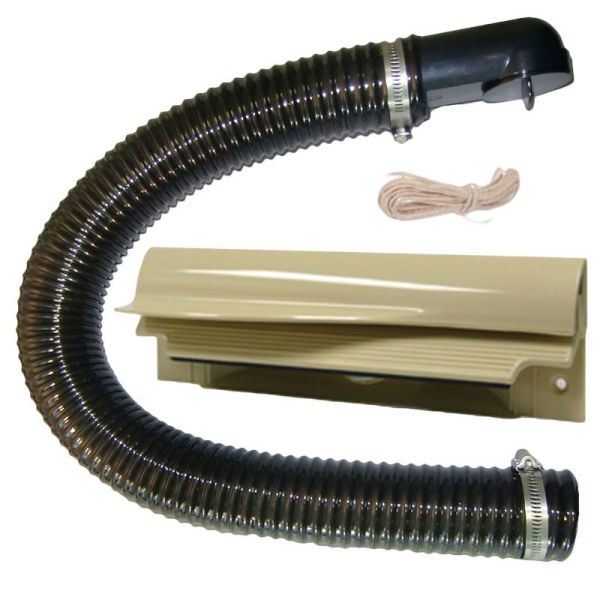
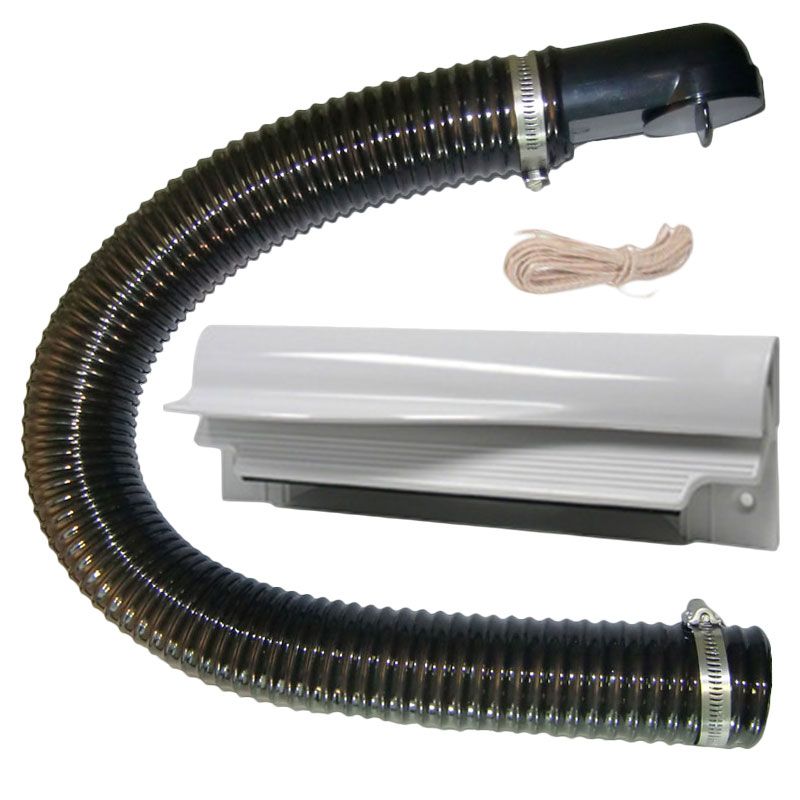
The VacuSweep Flexi Hose Adapter Kit is a flexible hose and adaptor kit that allows you to join an existing Central Vacuum PVC pipe to the kit included automatic dustpan.
Automatic dustpans are great for high traffic areas that need frequent sweeping. This makes it a great choice for in the kitchen, entryways & mudrooms, laundry rooms, and more!
Flexible Installation allows you to maneuver up and over tight areas inside your cabinets
Flexi Hose Kit Includes: 1 VacuSweep, 1 Flexi Hose, 2 Hose Clamps, 1 Sweeping Tee, 1 Short Tee Fitting, Special Couplers, and Low Voltage Wire
Available in White or Ivory
Large opening facilitates acceptance of material being swept into the valve
Fits easily in the kick space of a cabinet, or within a 2" x 4" stud wall
Spring-loaded wire connections reduce the time of installation
The VacuSweep Inlet Valve makes it easy for debris and dirt to be quickly swept and removed from non-carpeted surfaces. Great for use in kitchens, mudrooms, workshops, hair salons, retail stores, any "sweepable" area in either a residential or commercial environment, the VacuSweep Inlet Valve System will clearly satisfy all your needs. To activate the VacuSweep, simply open the door by raising the lever with your toe. To close the VacuSweep, simply close the door by pressing your toe on the ribbed surface.
VacuSweep Flexi Hose Adapter Kit Diagrams
Connection From Below
Turn the power to the vacuum unit Off. Measure distance (X) between the kickplate face and the inside edge of the cabinet, Then add 2 3/4 to the measured distance. Fig 1. Measure out the new distance (X + 2 3/4") from the cabinet door, to the reference mark.
Drill a small reference hole down through to the basement. Fig 2. Locate the reference hole in the basement and verify that there are no obstructions within 2 inches of either side and 4 inches behind.
Cut a 2 1/2" diameter hole from the basement up into the base of the counter using the reference hole as a center. Fig 3.
Using the reference hold as a center, cut a 2 3/8" high by 6 5/8" wide rough opening in the kickplate face. Fig 4.
Glue the long socket of the tight elbow onto a section of 2" central vacuum pipe. Make the terminal connections to the VacuSweep Sweep Inlet Valve by sliding the low voltage wire into wire clips. Turn the power to the vacuum unit to test the connection. After successfully completing the test, turn the power to the vacuum unit Off. Wrap a piece of wire/string around the pipe. Using the wire/string to temporarily hold the pipe and elbow in place, insert the VacuSweep Sweep Inlet Valve into the cabinet base and elbow. DO NOT GLUE this connection, it is designed for a friction fit. Fig 5.
Remove the wire/string. With the door in an open position, secure the VacuSweep Sweep IKnlet Valve to the cabinet base using #6 screws. Fig 6. Ensure that the spring on the electrical connector has 1/8" clearance to the rough opening. Continue with the remainder of central vacuum connections. When complete, turn the power to the vacuum unit On.
Connection From Behind
Turn the power to the vacuum unit Off. choose a location under the cabinet for the VacuSweep Sweep Inlet Valve so that it can be connected to the central vacuum pipe. Measure distance (X) between the kickplate face and the inside edge of the cabinet. Then add 2 3/4" to the measured distance. Fig 1. Measure out the new distance (X + 2 3/4") from the cabinet door, to the reference mark.
Drill a small reference hole down through to the basement. Fig 2. Locate the reference hold in the basement and verify that there are no obstructions.
Using a reciprocation saw, cut an access hole in the floor under the cabinet and approximately 8" behind the location of the VacuSweep Sweep Inlet Valve reference hold so that the VacuSweep Sweep Inlet Valve can be connected to vacuum pipe by reaching through the access hole. Fig 3.
Using the reference hole as a center, cut a 2 3/8" high by 6 5/8" wide rough opening in the kickplate face. Fig 4.
Insert a coupling onto the rear of the housing. DO NOT GLUE this connection, it is designed for a friction fit. Fig 5. Make the terminal connection to the VacuSweep Sweep Inlet Valve by sliding the low voltage wire into wire clips. Turn the power to the vacuum unit On to test the connection. After successfully completing the test, turn the power to the vacuum unit Off. Insert the VacuSweep Sweep Inlet Valve into the cabinet base and pipe.
With the door in an open position, secure the VacuSweep Sweep Inlet Valve to the cabinet base using #6 screws. Fig 6. Ensure that the spring on the electrical connector has 1/8" clearance to the rough opening. From the basement reach through the access hole and glue a section 2" central vacuum pipe to the coupling. Continue with the remainder of the central vacuum connections. When complete, turn the power to the vacuum unit On.
Connection In Wall
Turn the power to the vacuum unit Off. Remove the baseboard and locate studs in the wall where VacuSweep Sweep Inlet Valve will be installed. Locate a position where the inlet will be clear of vertical studs and have free access either up or down dependent on location of central vacuum connection to rest of the system. Fig 1.
Holding the drill at a 45° degree angle as close to the wall as possible, between located studs, drill a small reference hold through the floor and sub floor. Locate this reference hold frmo beneath and measure over approximately 1 7/8" to center of base place of wall. Ensure you have 1 1/2" clearance from any obstacles if connecting from below. Fig 2.
If installation is from below, use a 2 1/2" diameter hole saw to remove wood floor and base plate, sufficient to locate VacuSweep Sweep Inlet Valve cenntered over the reference hole. Fig 3.
Using the reference hole as a center, cut a 2 3/8" high by 6 5/8" wide rough opening in the wall and baseboard. Fig 4.
Glue the long socket of the tight elbow onto a section of 2" central vacuum pipe. Make the terminal connections to the VacuSweep Sweep Inlet Valve by sliding the low voltage wire into wire clips. Turn the power to the vacuum unit On to test the connection. After successfully completing the test, turn the power to the vacuum unit Off. Wrap a piece of wire/string around the pipe. Using the wire/string to temporarily hold the pipe and elbow in place, insert the VacuSweep Sweep Inlet Valve into the opening at the base of the wall and elbow. DO NOT GLUE this connection, it is designed for a friction fit. Fig 5.
Remove the wire/string. With the door in an open position, secure the VacuSweep Sweep Inlet Valve to the wall using #6 screws. Fig 6. Ensure that the spring on the electrical econnector has 1/8" clearance to rough opening. Continue with the remainder of central vacuum connections. When complete, turn the power to the vacuum unit on.
Read about the Flexi Hose Adapter Kit Central Vacuum VacuSweep Dustpan
Features:
Flexible Installation allows you to maneuver up and over tight areas inside your cabinets
Flexi Hose Kit Includes: 1 VacuSweep, 1 Flexi Hose, 2 Hose Clamps, 1 Sweeping Tee, 1 Short Tee Fitting, Special Couplers, and Low Voltage Wire
Available in White or Ivory
Large opening facilitates acceptance of material being swept into the valve
Fits easily in the kick space of a cabinet, or within a 2" x 4" stud wall
Spring-loaded wire connections reduce the time of installation
The VacuSweep Inlet Valve makes it easy for debris and dirt to be quickly swept and removed from non-carpeted surfaces. Great for use in kitchens, mudrooms, workshops, hair salons, retail stores, any "sweepable" area in either a residential or commercial environment, the VacuSweep Inlet Valve System will clearly satisfy all your needs. To activate the VacuSweep, simply open the door by raising the lever with your toe. To close the VacuSweep, simply close the door by pressing your toe on the ribbed surface.
VacuSweep Flexi Hose Adapter Kit Diagrams
Connection From Below
Turn the power to the vacuum unit Off. Measure distance (X) between the kickplate face and the inside edge of the cabinet, Then add 2 3/4 to the measured distance. Fig 1. Measure out the new distance (X + 2 3/4") from the cabinet door, to the reference mark.
Drill a small reference hole down through to the basement. Fig 2. Locate the reference hole in the basement and verify that there are no obstructions within 2 inches of either side and 4 inches behind.
Cut a 2 1/2" diameter hole from the basement up into the base of the counter using the reference hole as a center. Fig 3.
Using the reference hold as a center, cut a 2 3/8" high by 6 5/8" wide rough opening in the kickplate face. Fig 4.
Glue the long socket of the tight elbow onto a section of 2" central vacuum pipe. Make the terminal connections to the VacuSweep Sweep Inlet Valve by sliding the low voltage wire into wire clips. Turn the power to the vacuum unit to test the connection. After successfully completing the test, turn the power to the vacuum unit Off. Wrap a piece of wire/string around the pipe. Using the wire/string to temporarily hold the pipe and elbow in place, insert the VacuSweep Sweep Inlet Valve into the cabinet base and elbow. DO NOT GLUE this connection, it is designed for a friction fit. Fig 5.
Remove the wire/string. With the door in an open position, secure the VacuSweep Sweep IKnlet Valve to the cabinet base using #6 screws. Fig 6. Ensure that the spring on the electrical connector has 1/8" clearance to the rough opening. Continue with the remainder of central vacuum connections. When complete, turn the power to the vacuum unit On.
Connection From Behind
Turn the power to the vacuum unit Off. choose a location under the cabinet for the VacuSweep Sweep Inlet Valve so that it can be connected to the central vacuum pipe. Measure distance (X) between the kickplate face and the inside edge of the cabinet. Then add 2 3/4" to the measured distance. Fig 1. Measure out the new distance (X + 2 3/4") from the cabinet door, to the reference mark.
Drill a small reference hole down through to the basement. Fig 2. Locate the reference hold in the basement and verify that there are no obstructions.
Using a reciprocation saw, cut an access hole in the floor under the cabinet and approximately 8" behind the location of the VacuSweep Sweep Inlet Valve reference hold so that the VacuSweep Sweep Inlet Valve can be connected to vacuum pipe by reaching through the access hole. Fig 3.
Using the reference hole as a center, cut a 2 3/8" high by 6 5/8" wide rough opening in the kickplate face. Fig 4.
Insert a coupling onto the rear of the housing. DO NOT GLUE this connection, it is designed for a friction fit. Fig 5. Make the terminal connection to the VacuSweep Sweep Inlet Valve by sliding the low voltage wire into wire clips. Turn the power to the vacuum unit On to test the connection. After successfully completing the test, turn the power to the vacuum unit Off. Insert the VacuSweep Sweep Inlet Valve into the cabinet base and pipe.
With the door in an open position, secure the VacuSweep Sweep Inlet Valve to the cabinet base using #6 screws. Fig 6. Ensure that the spring on the electrical connector has 1/8" clearance to the rough opening. From the basement reach through the access hole and glue a section 2" central vacuum pipe to the coupling. Continue with the remainder of the central vacuum connections. When complete, turn the power to the vacuum unit On.
Connection In Wall
Turn the power to the vacuum unit Off. Remove the baseboard and locate studs in the wall where VacuSweep Sweep Inlet Valve will be installed. Locate a position where the inlet will be clear of vertical studs and have free access either up or down dependent on location of central vacuum connection to rest of the system. Fig 1.
Holding the drill at a 45° degree angle as close to the wall as possible, between located studs, drill a small reference hold through the floor and sub floor. Locate this reference hold frmo beneath and measure over approximately 1 7/8" to center of base place of wall. Ensure you have 1 1/2" clearance from any obstacles if connecting from below. Fig 2.
If installation is from below, use a 2 1/2" diameter hole saw to remove wood floor and base plate, sufficient to locate VacuSweep Sweep Inlet Valve cenntered over the reference hole. Fig 3.
Using the reference hole as a center, cut a 2 3/8" high by 6 5/8" wide rough opening in the wall and baseboard. Fig 4.
Glue the long socket of the tight elbow onto a section of 2" central vacuum pipe. Make the terminal connections to the VacuSweep Sweep Inlet Valve by sliding the low voltage wire into wire clips. Turn the power to the vacuum unit On to test the connection. After successfully completing the test, turn the power to the vacuum unit Off. Wrap a piece of wire/string around the pipe. Using the wire/string to temporarily hold the pipe and elbow in place, insert the VacuSweep Sweep Inlet Valve into the opening at the base of the wall and elbow. DO NOT GLUE this connection, it is designed for a friction fit. Fig 5.
Remove the wire/string. With the door in an open position, secure the VacuSweep Sweep Inlet Valve to the wall using #6 screws. Fig 6. Ensure that the spring on the electrical econnector has 1/8" clearance to rough opening. Continue with the remainder of central vacuum connections. When complete, turn the power to the vacuum unit on.
Specifications of the Flexi Hose Adapter Kit Central Vacuum VacuSweep Dustpan
Auto-On Inlet
Yes
We're currently collecting product reviews for this item. In the meantime, here are some reviews from our past customers sharing their overall shopping experience.
4.7
Out of 5.0
Overall Rating
94%
of customers that buy from this merchant give them a 4 or 5-Star rating.
Verified Buyer
September 2, 2023 by Lisa V. (US)
“Great product”
Verified Buyer
August 10, 2023 by Barbara B. (CO, US)
“Thank you especially to Iris!”
Verified Buyer
August 3, 2023 by Kathleen E. (US)
“Correct part, easy ordering on website, fast shipping!”
Items Included in the Flexi Hose Adapter Kit Central Vacuum VacuSweep Dustpan
Central Vacuum Flexible Hose
3-Foot 20-Guage/2-Wire Low Voltage Central Vacuum Wire


")